

You are using an out of date browser. It may not display this or other websites correctly.
You should upgrade or use an alternative browser.
You should upgrade or use an alternative browser.
Lightroom Classic help please
- Thread starter Judi Durber
- Start date
pwhole
Well-known member
I don't use Lightroom, but do use Photoshop, and no doubt there's a similar control in Lightroom for Shadows and Highlights. You should be able to bring the highlights down independently of anything else using that tool, but bear in mind that completely over-exposed areas will stay white, no matter what - or an ugly light grey if you turn it down enough. Controlling exposure underground is very difficult, but it's often better to underexpose slightly in order to have a bit of leeway with highlights, so you make them brighter, which is much better.
Also try and shoot in RAW if your camera allows it, as it has greater fidelity in terms of brightness (it's 12-bit instead of 8-bit), and can often salvage an image that would fail in a normal format.
Also try and shoot in RAW if your camera allows it, as it has greater fidelity in terms of brightness (it's 12-bit instead of 8-bit), and can often salvage an image that would fail in a normal format.
Judi Durber
Member
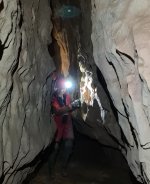
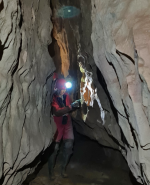
They have been shot in RAW & then use 'Auto' & a bit of 'dehaze'.
I thought you could isolate that bit & then alter the various buttons just for that part of the photo?
I thought you could isolate that bit & then alter the various buttons just for that part of the photo?
JoshW
Well-known member
the control you're looking for is probably curves.
This controls the exposure of the photo at various levels of existing exposure, if you were to tone down the highlights (by lowering the top end of the curve), and bump up the shadows (by raising the lower end of the curve) you will reduce the contrast, and reduce the overbearing look of the bright white spot of the headlight/ it's reflection off the rock.
There's loads of videos out there about how to use curves, and it's a really useful control to be used. Shooting in RAW means you'll still have at least some detail within the highlights.
I know lightroom on iOS has localised adjustments, where you can apply tonal adjustments on an overlaid shape, but not sure if lightroom classic has this.
chunky
Well-known member
Hey Judi,
You can select a brush tool in lightroom to mask just the blown areas, but as has already been mentioned only so much can be done with the dynamic range, and blown highlights are the hardest thing to recover.
Shooting raw certainly gives you a better chance to correct during the edit, but there are still limitations to what you can do with under and over exposed areas of the photo.
I'm guessing these are taken using a continuous light source? If so the camera will be pushing the iso to its limit and this will also limit what you can do in post production.
Sent from my SM-A715F using Tapatalk
Hi Judi,
I dragged your photo onto my desktop, opened it in Photoshop Elements (the stripped-down version of Photoshop, at a fraction of the price). I then drew an ellipse with feathered edges round the light area of your picture, and used the ?Shadows/Highlights? tool to reduce the exposure of the light areas. I think it does help a bit, but I guess you can?t really do much about the bright light source; maybe you could use the clone tool to obliterate some of it by overlaying it with background?
I then deselected the selection and applied the ?Shadows/Highlights? tool to the whole thing to bring out some detail in the dark area in the lower part of the picture. There's an interesting green bit of rock, but it's present in the original and has got somewhat more saturated during the manipulation.
Attachments
Judi Durber
Member
Chunkey why does this make a difference?
I'm guessing these are taken using a continuous light source?
chunky
Well-known member
Hey judi,Judi Durber said:Chunkey why does this make a difference?
I'm guessing these are taken using a continuous light source?
Other types of light source, i.e strobes or bulbs, are far more powerful than continuous lights such as torches and helmet lights. This volume of light necessitates the camera to be used with a lower ISO which means that more post data is being gathered than when the camera is running at its limits to capture an image. This in turn gives more scope for post production.
Sent from my SM-A715F using Tapatalk
pwhole
Well-known member
I generally try and keep ISO as low as possible for quality, whack the flashguns up high, use a shutter-speed as low as I can get away with, and then just vary exposure brightness with the aperture, as most things are in focus anyway after f11. I always shoot in RAW, to give as much latitude for post - it seems a lot easier to bring dark shadows up to usable, than to bring highlights down, so I'm not too upset if it looks a bit underexposed on-camera. Over-exposed highlights are so depressing if you wanted to keep the detail there.
That said, Adobe Camera RAW is currently a nightmare for me with a NVidia graphics card - last two versions have just crashed constantly whenever I'm working on a RAW image, but fine once exported to a 8-bit image. Adobe still not saying much, but there's clearly a problem as it's not just me moaning.
That said, Adobe Camera RAW is currently a nightmare for me with a NVidia graphics card - last two versions have just crashed constantly whenever I'm working on a RAW image, but fine once exported to a 8-bit image. Adobe still not saying much, but there's clearly a problem as it's not just me moaning.
