Olympus Tough Filter Thoughts

ZombieCake

Well-known member
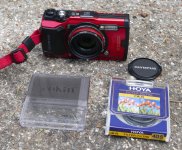
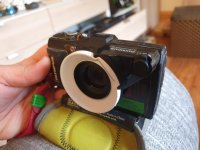
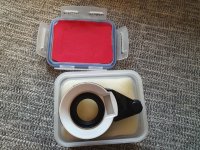
The Olympus TG series of cameras can add a variety of adaptors over the front lens for macro flashes, lens converters, etc.  One of the issues with these sorts of cameras is that the lens is exposed to possible damage (whether real or imagined) as there is no built in cover. Olympus make a rotating lens barrier, the LB-T01, for about ?35.  Pricey, but would solve the issue.  However, they also make a converter adaptor, the CLA-T01 for around ?20.  This is to allow attachment of add-on fisheye and telephoto lenses.  It also comes with a clip on lens cap (which somewhat annoyingly isn't shown in the adverts).  The filter thread on it is 40.5mm, which is a standard filter size.  I've seen some articles suggesting it's 45mm which is very much non-standard and incorrect.
So, I decided to go for the CLA-T01.  In order to protect the lens further I added a Hoya Fusion One UV filter.  This has finger print repellant coatings and good optical quality.  While I was at it, a circular polariser also found its way into the shopping basket, and would be an easy swap over (it'll also give you a couple of stops as an ND filter).
You could also use the square filter systems, such as the Cokin A size (67mm wide), or the Lee Seven5, via the appropriate adaptor.  I'd guess that full (as opposed to graduated) neutral density (ND) filters might be the most useful.  Given the lens is fairly small in diameter a soft ND grad probably wouldn't work very well, a hard ND grad might ? I'll have to experiment.  (The hard and soft is the transition between the dark part of the filter and the clear part.  Soft is gradual, good for landscapes.  Hard is very abrupt, good for seascapes. They both help balance exposure between land and sky).  I suppose a diffuser or movie mist might work as well if that's your thing.  Whether all that's kind of defeating the object of a rugged point and shoot camera is another thing!
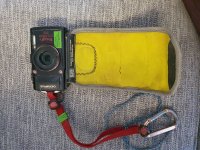
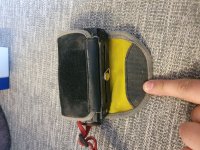
One other thing I suppose you could add would be a screw on rubber lens hood to reduce glare.
The main disadvantage to the CLA-T01 and UV filter combo  is that is does add a bit of extra depth to the camera, as opposed to the LB-T01 which is quite low profile.
The photo below shows what it looks like with some filters for comparison.  Thoughts and comments welcome.


Attachments

  • ToughFilters.jpg
    ToughFilters.jpg
    966.1 KB · Views: 479

phizz4

Member
I've got a similar set up on my TG5, with a low profile UV filter, although the adapter was sourced on A....n rather than Olympus as I didn't know they did one. My lens cap has a thin leash on it so it is larks footed to the clip on the side of the camera so I don't lose it. So far I've not noticed any problems with picture quality and it is reassuring to know that the lens cover is much less likely to get scratched.
 

Fulk

Well-known member
I've used an adaptor plus UV filter and/or lens cap within a week or two of buying a TG camera, and it works fine for me.
 

JJM

Member
I've had my TG-4 for 3 years now. While it's a "Real" photographers camera it's perfect for just general as-you-go caving snaps, without holding up the group too much.
Right at the beginning I made the decision that I won't try to keep my camera too clean or pristine, instead opting to carry it on my neck and/or down my suit, ready to pull out at a seconds notice. This worked great for me, and I captured many facebook-profile-portraits for my friends and freshers we take caving with Reading Uni CC.
This camera got WAY more use, and took way more photos (including some cool arranged / "art" shots, even with flash guns) than the Canon G12 with dive case that the club owns, purely because it's so small, easy to pull out, and doesn't take loads fo space in tackle bags.

But back to what you actually asked. As you can tell I'm not too precious about my camera, but I wanted to give it the best shot at surviving a reasonable time, so here are some things I got to protect it & how they worked out for me:

- threaded lens conversion ring (for attaching filters to protect the lens) - this is always on, and never gets taken off / swapped back for the "standard"one. If you get the camera muddy or dunk it in really muddy water you will probably need to twist it off to get the gunk from the "bayonet" mounting holes. I need to do this probably 1/10 trips.

- 40.5mm UV filter - I just wanted something to protect from scratches, and not for it's photographic properties (sorry, most of your technical description went over my head). It works well for that, but unless you carry your camera in some sort of case & protect it from mud/water there are some issues. :
1) since i carry my camera on my chest / stomach I managed to crack/shatter the filter twice by lying on my camera when going through squeezes. (with the lens right over a pointy rock) I didn't mind as the filters are quite cheap and I can put up with replacing them if it means I have easy-access to my camera. A sturdier case/sleeve around the camera or using a clip-on lens cap over the filter might have prevented this, but that's too much faff.
2) since the "twist - bayonet" mounting fro the conversion ring is in no way waterproof cave water gets in between the camera lens and filter if you get the camera submerged (think crawling in streamways, sumps, climbs up waterfalls) and then takes a while to trickle out. You then either sit there waiting for the "water line" to descend across your lens, or like me get frustrated, and twist the ring off to let the water out. But then the lens is wet, so you have to wipe it if you want to take a pic, which defeats the whole purpose of having a filter in the first place... After a few times I learned and if I was planning a particularly aquatic trip I would leave the filter off.
In hindsight I think I would have filled the bayonet ring receptacle on the camera with silicone right before attaching the conversion ring, making it permanent, but also waterproof, and used some grease on the threads of the filter which may have prevented the water-in-between problem...
I don't know if this has been improved on the tg-5 & tg-6...
3) you talk about the depth that the adapter+filter add to the camera. I did not really notice that in sue, as I think it's still skinnier than the handgrip part. If anything I prefer to get pointy rocks braking my filter rather than my lens!

- a wrap-around neoprene always-on camera case (mine is by PEDCO brand) It's the best thing since listed bread. It's a long strip of neoprene that attaches to the tripod mount thread on the underside of the camera, wraps around and secures with a  strip of velcro. If you want to take a pic you pull open the velcro and let the case hang

- a TEMPERED GLASS screen protector for the display. This is SO MUCH better than the thin soft plastic kind that always come off. My first one lasted well over a year and I only replaced it after i dropped the camera and cracked it. When put on correctly you can hardly tell it's even there, yet it protects the display beautifully.

- I did also get the FD-1 flash diffuser, which can produce some really cool close-ups & macros of formations (because of it's adjustable intensity selector), but is delicate and would need to be carried separately. Because of this i have not actually used it much at all.
 

Attachments

  • 20200619_174800.jpg
    20200619_174800.jpg
    3 MB · Views: 176
  • 20200619_174816.jpg
    20200619_174816.jpg
    2 MB · Views: 179
  • 20200619_175346.jpg
    20200619_175346.jpg
    821.9 KB · Views: 186
  • 20200619_175400.jpg
    20200619_175400.jpg
    1.7 MB · Views: 169

ZombieCake

Well-known member
a TEMPERED GLASS screen protector for the display.

Thanks, I was wondering about those.  Plastic ones do seem need nails or gaffa tape...  Thanks for the report -ordered a flash diffuser as that'll help with stuff I'm investigating.
 

The Old Ruminator

Well-known member
I must admit that a pair of Yongnuo slave flashguns have perked up the Olympus photos considerably. Backscatter was always the problem when just using the onboard flash. I got some good results using the Live Composite Mode.
 

mrodoc

Well-known member
Shooting in RAW and using dehaze helps. The Photoshop Raw filter has also worked well on scanned slides taken in steamy environments. You have to adjust colour balance as well if you do this.
 

Laurie

Active member
mrodoc said:
Shooting in RAW and using dehaze helps. The Photoshop Raw filter has also worked well on scanned slides taken in steamy environments. You have to adjust colour balance as well if you do this.
For those of us who can afford Photoshop!
 

mudman

Member
Laurie said:
mrodoc said:
Shooting in RAW and using dehaze helps. The Photoshop Raw filter has also worked well on scanned slides taken in steamy environments. You have to adjust colour balance as well if you do this.
For those of us who can afford Photoshop!
I've recently downloaded RawTherapee for RAW processing. It's an excellent open source product and is hugely powerful. Most importantly it handles the Olympus RAW format and processing is impressively fast. Much quicker that the Olympus Viewer. Means I don't have to export as a TIFF and import into GIMP.
 

mrodoc

Well-known member
That looks like a pretty sohisticated piece of software. This sort of software is excellent for resuscitating old digitised colour slides.
 

The Old Ruminator

Well-known member
mrodoc said:
That looks like a pretty sohisticated piece of software. This sort of software is excellent for resuscitating old digitised colour slides.

Here is one he resusticated last week. Me centre. The late John Keat left, and Pete Rose. Pete Rose Slide Collection c 1970. The road near GB, Mendip.

Near GB by Nicholas Chipchase, on Flickr
 

mudman

Member
mrodoc said:
That looks like a pretty sohisticated piece of software. This sort of software is excellent for resuscitating old digitised colour slides.

And possibly negatives too.
I've noticed that there is an option on the RAW tab to process negative images. It will only handle RAW files at the moment although I saw that there is a bloke working on an option to do the same for TIFF images.
 
Top