alastairgott
Well-known member
With a lack of other things to do, the lectures continue (or tutorials), I think they're called lectures if everyone's yawning at the back  and tutorials if they get out a big stick and make you do work.
either way, not arsed about anyone hopping in on this thread and asking questions or posting up problems from other caves, might make it a little livelier.
So this time, we're leaving the plan alone, as I've not received anyone's work on Fox chamber yet...
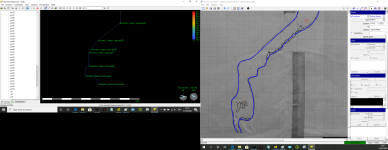
And we're going to concentrate on the elevation, one which will be familiar to those who read COPD and those that drew the original. I'm going to show how we can manipulate the drawing, which could prove useful in some caves where you for instance find a bypass or other passage which completely wrecks your elevation drawing.
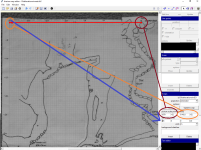
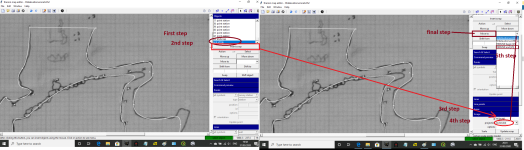
I'm not sure if I explained it last time, but it's important we define the scrap scale and the projection, this is done in the tab on the side marked scraps.
Projection
Pretty self explanatory, each scrap needs to be defined as either plan or extended, (ignore the "elevation" or none, as these are seldom used, elevation is for a cross section at a particular angle- useful but not right now )
Scrap scale
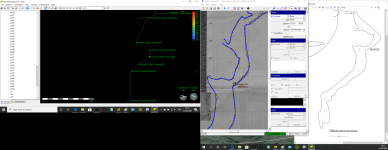
In this case, Wardy has given us some lovely scales on the side of his drawing, so I've picked the top scale from 0 to 35. I moved the ends of the red arrow across to these points. and then set the "real scale point" box to be -35 with the rest of them being 0.
this means that in high school speak we've given it x & y for zero,zero (at 1140,-65) and x & y for -35,0 (at 1979, -65).
ie no change in y but changes in the x value.
it will only show the scale bar when we have the start of the scrap highlighted.
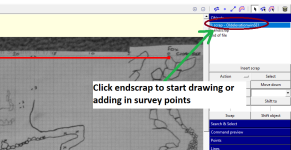
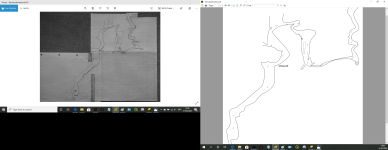
Plotting survey points
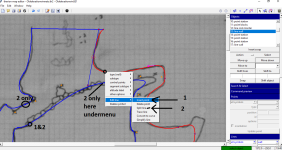
now we need to highlight endscrap to start adding things to this drawing. We need to ensure these are between the start of the scrap and the line that says endscrap.
Remember that game that teachers made you play, "Simon Says", this is a lot like that, if the things that your adding into the drawing are not between these two lines, then the software will ignore you.
It's really useful to have the survex model open at the same time when plotting the survey points.
So to add in a survey point, select the point tool (survey station is default), click where you want the survey station to be and in the points window on the side, type into the options command box -name fc5
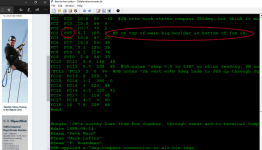
the -name tells it to look for a survey point in your .th (data file), so when we look in ours, we can see fc5 is the big boulder in fox chamber, that description is good enough for me and matches with the survex model.
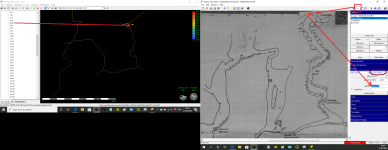
So we can do a simple elevation by drawing round the walls and plotting some of the points, but not all. for speed, I will do this.
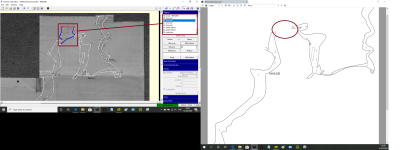
Errors
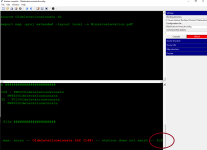
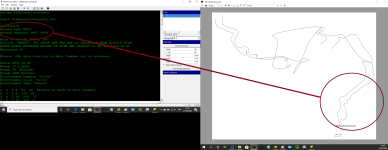
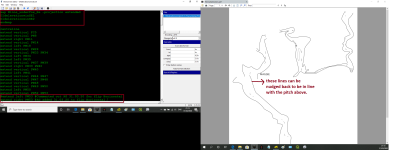
Sometimes you will get an error when you run the file, the best way to combat this is to run the file very regularly, so you can understand what it doesn't like.
I just got an error which tells me that when I typed fc5 (for that point I showed you how to place), this did not match the survey data which uses capital letters, so a quick amendment of that point to FC5 will sort the error and allow it to run.
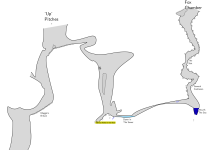
Your first elevation
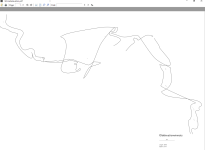
So you're first elevation will turn out like the attachment below, it's a pretty picture but we've got water being held in a nearly upside-down sump. and all manner of weird squiggly lines.
I will teach you how to get this under some control...
and tutorials if they get out a big stick and make you do work.either way, not arsed about anyone hopping in on this thread and asking questions or posting up problems from other caves, might make it a little livelier.
So this time, we're leaving the plan alone, as I've not received anyone's work on Fox chamber yet...
And we're going to concentrate on the elevation, one which will be familiar to those who read COPD and those that drew the original. I'm going to show how we can manipulate the drawing, which could prove useful in some caves where you for instance find a bypass or other passage which completely wrecks your elevation drawing.
I'm not sure if I explained it last time, but it's important we define the scrap scale and the projection, this is done in the tab on the side marked scraps.
Projection
Pretty self explanatory, each scrap needs to be defined as either plan or extended, (ignore the "elevation" or none, as these are seldom used, elevation is for a cross section at a particular angle- useful but not right now
)Scrap scale
In this case, Wardy has given us some lovely scales on the side of his drawing, so I've picked the top scale from 0 to 35. I moved the ends of the red arrow across to these points. and then set the "real scale point" box to be -35 with the rest of them being 0.
this means that in high school speak we've given it x & y for zero,zero (at 1140,-65) and x & y for -35,0 (at 1979, -65).
ie no change in y but changes in the x value.
it will only show the scale bar when we have the start of the scrap highlighted.
Plotting survey points
now we need to highlight endscrap to start adding things to this drawing. We need to ensure these are between the start of the scrap and the line that says endscrap.
Remember that game that teachers made you play, "Simon Says", this is a lot like that, if the things that your adding into the drawing are not between these two lines, then the software will ignore you.
It's really useful to have the survex model open at the same time when plotting the survey points.
So to add in a survey point, select the point tool (survey station is default), click where you want the survey station to be and in the points window on the side, type into the options command box -name fc5
the -name tells it to look for a survey point in your .th (data file), so when we look in ours, we can see fc5 is the big boulder in fox chamber, that description is good enough for me and matches with the survex model.
So we can do a simple elevation by drawing round the walls and plotting some of the points, but not all. for speed, I will do this.
Errors
Sometimes you will get an error when you run the file, the best way to combat this is to run the file very regularly, so you can understand what it doesn't like.
I just got an error which tells me that when I typed fc5 (for that point I showed you how to place), this did not match the survey data which uses capital letters, so a quick amendment of that point to FC5 will sort the error and allow it to run.
Your first elevation
So you're first elevation will turn out like the attachment below, it's a pretty picture but we've got water being held in a nearly upside-down sump. and all manner of weird squiggly lines.
I will teach you how to get this under some control...