If you were to make your own caving bag....

Ian Ball

Well-known member
The cylindrical shape is better for cylinders and bdhs etc.

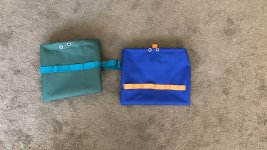
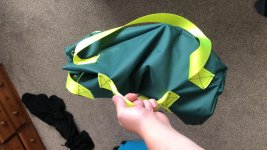
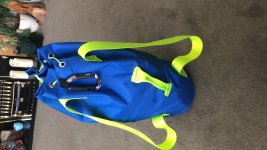
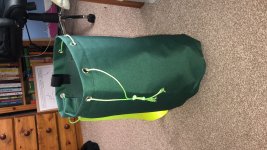
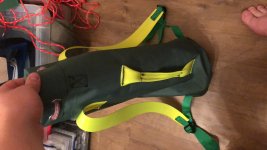
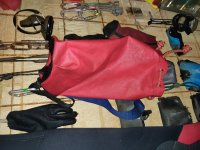
I have a waist belt on the 33l sack I got from Landjoff and it's great, it is detachable which is a benefit.  I generally leave it at a cave entrance though.

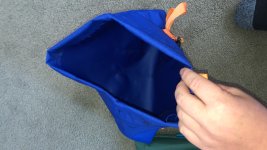
Interestingly the design of the Landjoff bag has changed with the later versions and it's all for the better.

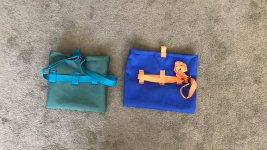
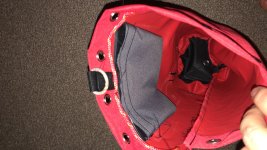
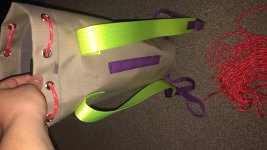
the straps used to go through the bottom drain holes as a way of secure them, it means the straps are really long and often you knelt on them when crawling.  the new bag has pvc fins with a drain hole eyelet in which the strap is secured to.  It also allows the waist belt to be attached to the bag via little duffel coat like toggles rather than the original style where webbing was threaded through the lowest side drain hole eyelets.  fine to start with as you have an empty bag, thread in the belt and fill up the bag, then slide it out at the cave, but on the way home you have to pretty much empty the bag to reattach the belt. 

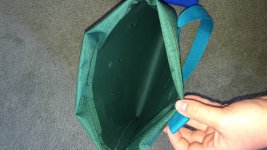
The base also has piping around the edge to protect it a little more.  It means the Landjoff bag is no longer ludicrously good value as the postage from Bulgaria makes them the same price as buying a bag from a UK manufacturer but I like the one I have.  Not to plug them any more but if your club sets up an account with them (and you can use a members details and they just assign the club account to it) there is a ten percent discount.

However having just had a look, the postage costs more than buying a bag as they are only sending via courier.
 

Pitlamp

Well-known member
Does anyone remember those "Bomb Proof" tackle bags that were around for a while? Tough as nails but made from black tractor tyre rubber evidently, so very heavy. Great for resistance training before expeditions!

I wonder if these are still made, for other markets?
 
Ian Ball said:
The cylindrical shape is better for cylinders and bdhs etc.

That depends on what you are carrying - for example I can get 2 x 3s in my Huatla - I can only get one in the cylindrical bags the club has. But horses for courses of course.
 

JWright

New member
SO these are some bags I've made for climbing shoes. Idea is that you put your approach shoes and a belay jacket in there, strap it round your waist. Then at the top you have your shoes to put back on. Might be useful for caving?
 

Attachments

  • 48F399AA-D3C6-4BC5-8B09-47188FAC2D19.JPG
    48F399AA-D3C6-4BC5-8B09-47188FAC2D19.JPG
    2.6 MB · Views: 213
  • 4CAD4CF9-CFA0-42D2-A201-BBB603682DD5.JPG
    4CAD4CF9-CFA0-42D2-A201-BBB603682DD5.JPG
    2.7 MB · Views: 211
  • 247B2DF6-9F85-4677-B613-6E458E538E86.JPG
    247B2DF6-9F85-4677-B613-6E458E538E86.JPG
    2.3 MB · Views: 203
  • F98EBFDF-ABEF-4138-B74A-9A29F431F90A.JPG
    F98EBFDF-ABEF-4138-B74A-9A29F431F90A.JPG
    2 MB · Views: 202

JWright

New member
And these are the bags I've made for my fiends with the idea of caving. There is a drainage hole in the bottom and after I made these I made one with adjustable shoulder straps.
 

Attachments

  • 71EC5EA6-A5E5-4B29-8BA8-C326D78D546B.JPG
    71EC5EA6-A5E5-4B29-8BA8-C326D78D546B.JPG
    1 MB · Views: 222
  • 87AFF503-2EA7-4D4F-A77B-24170C062784.JPG
    87AFF503-2EA7-4D4F-A77B-24170C062784.JPG
    1.8 MB · Views: 228
  • 136074FD-E258-4CE1-8579-75B2C07FF1DB.JPG
    136074FD-E258-4CE1-8579-75B2C07FF1DB.JPG
    2 MB · Views: 221
  • A374CF48-CD70-4043-B2A7-28DEA20CEBBD.JPG
    A374CF48-CD70-4043-B2A7-28DEA20CEBBD.JPG
    2 MB · Views: 224
  • E79DB53E-D223-40DF-BDF8-1A54DB5EB1A9.JPG
    E79DB53E-D223-40DF-BDF8-1A54DB5EB1A9.JPG
    2.6 MB · Views: 228

JWright

New member
My only worry is that they aren't as tough and long standing as I would like them to be. I guess only time will tell...
 

PeteHall

Moderator
If you can fix them yourself (and enjoy making/ fixing kit) it doesn't really matter if they don't last as long as something else.

Anyway, right now, everything is lasting much longer than usual! Perhaps the only good thing to come of this lockdown...
 

JWright

New member
So I think I have made in the region of 15 bags now. Every iteration gets better and better. The next bag to make is going to have the handle and loop as 1 piece of webbing. (My friend Joe suggested it)
Here are some pictures!
 

Attachments

  • CB0E1D7F-E99E-4E0F-8D23-0D7BD8FD6DD3.jpeg
    CB0E1D7F-E99E-4E0F-8D23-0D7BD8FD6DD3.jpeg
    2.1 MB · Views: 207
  • EF716634-9C74-4FD2-87BD-B834C82DD0D0.jpeg
    EF716634-9C74-4FD2-87BD-B834C82DD0D0.jpeg
    1.7 MB · Views: 205
  • C89D9F0E-1ECB-46EE-BA99-AAFF1493DA42.jpeg
    C89D9F0E-1ECB-46EE-BA99-AAFF1493DA42.jpeg
    1.3 MB · Views: 207
  • 1520A7B5-931F-46A8-BE8C-29405FEADD55.jpeg
    1520A7B5-931F-46A8-BE8C-29405FEADD55.jpeg
    2.1 MB · Views: 198
  • 0FE0E6CE-4BB4-4A72-B230-3F5173C0901E.jpeg
    0FE0E6CE-4BB4-4A72-B230-3F5173C0901E.jpeg
    2.1 MB · Views: 206

jcarter5826

Member
Having the handle as one piece of webbing running up the length of the bag is the way to go. Look here:

https://jcarter5826.wixsite.com/johnshomebuiltstuff/caving-rope-bag-1


Sent from my iPhone using Tapatalk and usage of fingers
 

MinimalMayhem

New member
jcarter5826 said:
Having the handle as one piece of webbing running up the length of the bag is the way to go. Look here:

https://jcarter5826.wixsite.com/johnshomebuiltstuff/caving-rope-bag-1


Sent from my iPhone using Tapatalk and usage of fingers
OT I know, but I?m loving the cartwinder on your site[emoji106][emoji23]


Sent from my iPhone using Tapatalk
 

PeteHall

Moderator
Thanks very much to JWright for the bag (picture 2/3 from his post above). It's been put through its paces, but after a quick scrub in the bucket (after I'd broken the ice off) it's looking pretty much like new!

I would echo John's advice regarding the webbing for the side handle. I think that this does most of the work when the going is tough, so it's worth putting in the extra effort to strengthen this.

Also, for the benefit of anyone else making their own bag, make sure to leave a bit of slack for the cord through the eyelets, or it has a tendency to jam up when muddy...


Attachments

  • 20201229_205750.jpg
    20201229_205750.jpg
    5.9 MB · Views: 211
  • 20201229_213716.jpg
    20201229_213716.jpg
    6 MB · Views: 207

Pony

Active member
JWright said:
The reason I as Is because i have a sewing machine and some cordura and, perhaps stupidly, thought: how hard could it be?
I have made 4 caving bags so far with each one getting better.
Some features I have added:
- Carabiner loop at top (but i like the idea of a metal d ring that some people are suggesting)
- Drain hole in the bottom
- Adjustable shoulder straps
- Carry hand down the back between the shoulder straps

They are all cylindrical. I think the bases need more work. It is really difficult to get the size of the fabric right to sew into it.
You have all made me think about how to reinforce the base....
Try a rolled hem, sandwiching a length of 10mm blue polypropylene rope inside
 

PeteHall

Moderator
Thanks very much to JWright for the bag (picture 2/3 from his post above). It's been put through its paces, but after a quick scrub in the bucket (after I'd broken the ice off) it's looking pretty much like new!

As a bit of an update, I've found this bag to be the perfect size for carrying a BDH drum andit can now boast four trips to Otter Hole, once to the end and three times as far as Sump 2. It's also been on a few digging trips and a few family trips too.

It's showing signs of wear, but is still completely functional.

It actually looks like the fabric is going to fail before the stitching, which is surprising, but a credit to @JWright (or his sewing machine).

It probably helps that (for the long Otter trips at least) it's had my diving regulators in, so it's been carried with care, but either way, it's holding up pretty well (y)
 

cavemanmike

Well-known member
I don’t know why wardy hasn’t come up with some bag’s,his staff certainly have the skills to produce them 👿👿👿
 
Top