The way I'd build one is based on the link from martin s. I'm assuming you've found links on basic working environment and methods, and where to get the materials.
First make a mould (which will require an initial mould). Instructions are for the real thing but I suggest you practice with small bits to get the techniques first.
1. Start with a flat sheet of anything smooth, at least the diameter of the screw - glass would be OK. Polish well (6 coats of mould wax). If unsure of polish, apply release agent as well, but the finish won't be as good and may take more work later. Coat with gelcoat, leave until set but tacky, then coat with laminating resin, lay 2 layers of chopped strand into the resin and brush or roll until saturated. (Always best to put the resin down first and being it through the glass, rather than putting the glass down dry - avoids trapped air).
2. About 24hrs after, pull carefully away from the flat sheet and trim to make a disc of the screw diameter. When the resin's fairly new you can cut it with a sharp knife, when it's older it will require a saw. Get the diameter as accurate as you can as this is the pattern for the whole screw (see below for why the mould edge has to be accurate). Also cut out the inner diameter. The smooth face will become the face of the mould so keep it smooth.
3. Cut the disc down one radius and pull out of plane into the screw shape. Make a timber frame to hold it there. Glue the frame to the back of the distorted disc and then laminate strips of chopped matt over it. If the disc edges are too floppy, laminate more glass onto the back. This is the mould.
4. If there are any air bubbles or other blemishes on the face of the mould, fill with resin (car body filler is easier but may need to be re-done later) sand flush and use finer sandpaper to get really smooth. Ideally it will have come off the original glass or whatever so smooth that it doesn't need anything except polish (which is why it's best not to use release agent if you can avoid it). Polish the mould up, 6 coats of wax. Needs to be a week old before polishing.
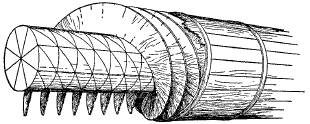
Now you have a mould, use that the same way to make screw sections. Since the mould was pre-curved, the screw sections should all have the same curve.
5. As before, apply gelcoat, allow to set and then apply resin and chopped strand - maybe need 4 layers? A key trick now - this is why the mould edge has to be right. When the resin has set to the consistency of hard cheese, get a stanley knife and cut round the edges of the mould. Done at this stage, you can get a good clean edge with very little work. If you wait, it will be dusty and horrible work. Re-polish the mould every 5 uses of it if you have trouble releasing.
6. If you haven't sourced the centre shaft, you may need to make one. Find a suitable plastic pipe and use it as a permanent former - just apply resin and chopped mat. Gelcoat is only needed if you want to get it off the mould, but leave the pipe in and it's not a problem.
7. Fit the screw sections to the centre. I've used Arapdite Rapid as a "tack weld" for such. Then laminate strips of chopped mat or possibly woven tape to hold them on and (on the back face) to cover the joints.
8. Finished. Realise that it's taken a lot of work and wish you hadn't started.
Good luck!


")