• CSCC Newsletter - May 2024

    Available now. Includes details of upcoming CSCC Annual General Meeting 10th May 2024

    Click here for more info

Inside The Petzl Duo

Christian_Chourot

New member
A while ago I took my Duo apart to explore why it wasn't working too well. I thought I'd take it apart again and take some pictures to show everyone what's inside.

First things first - If you do any of this, before you start, take the batteries out, there is a lot of bare metal inside and I managed to short the battery and heat things up very nicely when I first opened this up. Ooops.

2910888066_34193cf4a3_m.jpg
2910043001_b8cfd7fc0f_m.jpg
2910888212_52d69ac3aa_m.jpg
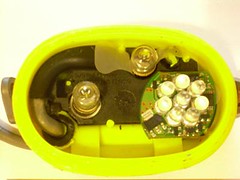
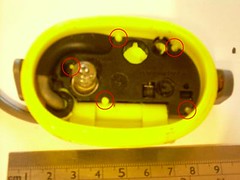
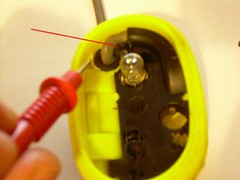
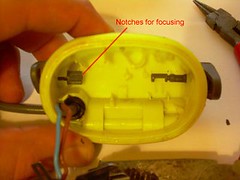
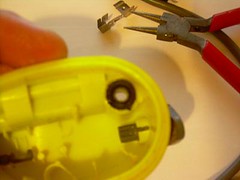
1) The naked duo - let's pull out the LED and spare bulb2) Here I've circled the 5 yellow posts that you need to saw off with a scalpel etc to be able to pull the rest out.3) I also prized away the yellow strip shown by my probe, and cut the black plastic at the point shown by the red line to make it easier to remove the gubbins inside. This is very difficult to pull out, I remember using a combination of jewelery screwdrivers and pliers but don't recall exactly what I did.
2910043211_bdf665257a_m.jpg
2910888766_2ff996161f_m.jpg
2910889608_d7579dffc4_m.jpg
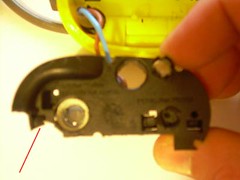
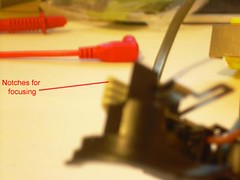
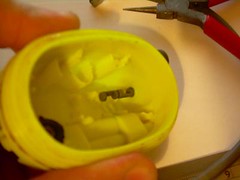
4) See? There's a bit missing. Doesn't seem to matter much though. 5) Here you can see the notches that move the bulb up and down for focusing the spotlight. The bulb holder is a movable piece of white plastic that has corresponding notches.6) And here is a view down the hole through which the wire enters the light - you can just about see how the black ring I cut off isn't part of a seal, all that seals the unit is how tightly the wire fits inside the yellow bit. Sorry the photo isn't better, it's the best I could do.
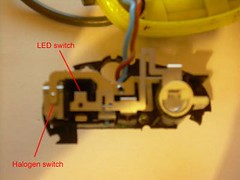
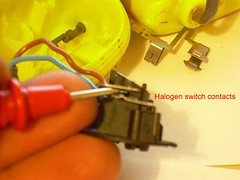
2910888668_5813470466_m.jpg
2910044653_308a10166e_m.jpg
Off.gif
7) Here's the edge of the bulb holder.8 ) And here's the end of the switch emerging inside the light. Two parts of the shaft are reduced to flat surfaces at different angles to each other. The one nearest to the edge of the light operates the halogen bulb, the other one operates the LED. The movement of the metal part that the latter surface sits on is very subtle and it's easy to mess up operation of the LED if you managed to bend it. 9) The switch in each position, I'm sure you can work out which is which.
2910043367_5cc2e460af_m.jpg
2910044401_cab1999348_m.jpg
2910923902_065e659130_m.jpg
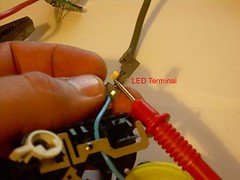
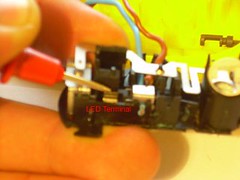
10) The posterior aspect of the gubbins. Here you can see the points that the switch operates. Note how there's not much to push on to switch the LED on and off.11) This is the part in contact with one leg of the LED. I'm afraid I forgot to get my multimeter out so I'm not sure if it's for the anode or cathode but you can test the LED itself if you want to work it out. It's just a tiny bit of sprung metal. I bent this out a bit to solve part of my problem with my light, It would often go out if I bumped my head and I suspect that this was in part to blame although there was also a problem with my battery box.12) Don't remove the post in the middle of this metal piece, or in fact remove this piece of metal. It's a pivot point required for the halogen switch to work properly.
2910044141_11dd676b2c_m.jpg
2910889100_839571ddcb_m.jpg
2910889008_eeb55d04f1_m.jpg
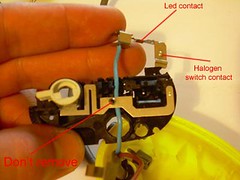
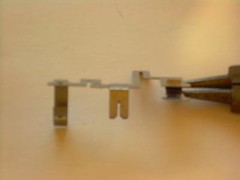
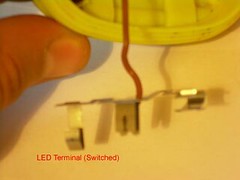
13) Here's where the other leg of the LED Module makes contact with a sprung, bent piece of metal operated by the switch - in other words, the metal piece is moved onto the leg of the LED to make it turn on. Don't bend this sprung piece unless there's something wrong with it and your light isn't turning on, if it's bent too far your LED will be on all the time - like I said, the switching action is subtle.14) Once again, here's the permanently connected leg of the LED module.15) Here's the halogen switch from the side.
2910888834_a886dd68ac_m.jpg
2910043569_a9389f1535_m.jpg
2910888922_8ea5235d14_m.jpg
16) You can see (just about) in this picture where the blue wire makes contact with the permanently connected LED leg. When the halogen switch is closed, it's this wire that supplies the side terminal of the halogen bulb.17) See the uppermost bit of metal? That's the bit that's coming off next, it supplies the bottom terminal of the halogen bulb. It levers off fairly easily.18) Here it is, on the left is the moving (switching) contact of the LED, in the centre the grove that cuts into the wire supplying this piece and on the right is the bottom terminal for the bulb which can be a pain to get back in position sometimes to pay attention before you take it out as to where it should sit.

2910889252_4b837c496b_m.jpg
2910044499_5641f36af8_m.jpg
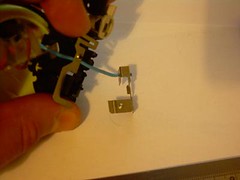
19) Here'e the wire connected up, ready to put back in. There's just a nick in the insulation and the wire is rammed down tightly to bring the wire into contact inside the metal groove.20) Finally, here's the other removable piece where the blue wire is connected. The blue wire passes underneath the metal that pivots on the black plastic post that I suggested not to remove.

Well that's about it. It's straightforward to put it all back together as long as you were paying attention when you took it apart. Pay particular attention to where the wires run, they run underneath various points to let everything slot together neatly and none of my photos of them came out well.

I hope this has been of interest/use to some people if their light is out of warranty and they fancy taking it apart. It is possible, it's just not easy to lever the whole thing out the first time. I wouldn't recommend doing any of this unless you really have to though.
 

SamT

Moderator
tremendous - good work, and thanks for taking the time to put that post together,
Im sure someone out there will find it useful.
 
A

Agrophobic

Guest
Many thanks for the info.
I recently noticed that mine wasn't as bright as i remembered and probing around with the mutimeter showed high resistance (100ohms  :eek: ) between the battery terminals and the bulb contacts, so stripped it down and replaced the wiring. the knife edge contacts to the cable are a point of failure with the duo. soldering the wires on improves things but soldering to stainless steel is tricky to do as the solder doesn't take too well.
All is now ok and back to low resistane and full brightness.  :D
 

Christian_Chourot

New member
That's a good point actually, mine was noticably brighter when I reassembled it too just from removing corrosion. Not as bright as my scurion though for some reason... ;)
 

anfieldman

New member
Christian_Chourot said:
That's a good point actually, mine was noticably brighter when I reassembled it too just from removing corrosion. Not as bright as my scurion though for some reason... ;)

Perhaps you could take your Scurion apart and photo it all for us. It would be interesting to see if that was still as bright too!
;)
 

Christian_Chourot

New member
anfieldman said:
Christian_Chourot said:
That's a good point actually, mine was noticably brighter when I reassembled it too just from removing corrosion. Not as bright as my scurion though for some reason... ;)

Perhaps you could take your Scurion apart and photo it all for us. It would be interesting to see if that was still as bright too!
;)

I'd love to! Unfortunately, I don't have the necessary containment field to restrain the miniature sun contained within and I might end the universe.
 

Burt

New member
:LOL: nice one Juniper!

Also good work to you Christian, awesome stuff - better than petzl!

I found when I took mine apart, the ends of the wire had corroded and gone green. Replacing the wire was easy enough but now, despite silicon sealant, the whole unit lets in water. Not disatrously but enough to have little beads of damp between the LEDs and the lens.

So be careful - these things don't like being taken apart, and as you can see from Christian's pics they are a bit "mickey mouse" inside - especially the switching system.
 

Peter Burgess

New member
So if your wire ends had gone green does this imply that moisture was getting inside before you dismantled it, Burt? Does anyone have a good idea on where the damp gets in? If there is a way to reduce the risk of it happening in the first place, I would like to give it a try.
 

Christian_Chourot

New member
I think to avoid it, the key is not to open the lamp unnecessarily.

If you do open the unit, I think it's important to pay attention to where the arrows on the bezel are to begin with and not to overtighten it as I think eventually you'll fatigue the seal by doing so. Think I did it to mine, so now I have to have it screwed up extraordinarily tightly to stop it leaking (though that's not too much of a problem as my hands are fairly vice-like!)
 

menacer

Active member
Peter Burgess said:
So if your wire ends had gone green does this imply that moisture was getting inside before you dismantled it, Burt? Does anyone have a good idea on where the damp gets in? If there is a way to reduce the risk of it happening in the first place, I would like to give it a try.

Judging by the ammount of people on and off this forum with similar stories its safe to say that they are not waterproof and only last about a year (of average use, and average maintenance**) before the wires corrode, resistance goes up and brightness goes down...
** there will be exceptions to this rule

Juniper your right, I think darkplaces did try dismantling his sun and broke it...then fixed it... :cry: not recommended....

Link here


Peter Burgess

New member
In this new era of 'make do and mend', Christian's write-up is welcomed. I assume he got his lamp working better, as did Agrophobic, so any advice that postpones the day when you have to repair the lamp is worth having. (y)
 

potholer

New member
Christian_Chourot said:
Burt said:
now, despite silicon sealant, the whole unit lets in water.

I take it you mean silicon grease, not the stuff for baths and kitchens!
Maybe that was silicon sealant around the new wire entry?

If there's a problem with switch contact corrosion, is there any preventive maintenance that could be done? Looking at the remains of a gutted Duo I was contemplating doing a major mod on, it doesn't look like the contacts are really accessible without a full dismantling.

One funny thing I noticed - for the one-off mod I was thinking of for a friend, I was trying to work out possibilities for a switch - the regular switch lever seems only to be held into the headset by the switch contacts, so I was thinking of maybe ignoring that and doing something using the focussing lever as a more solid control.
In my headset, that lever was stiff, so a month or so ago, I tried a little silicon grease on it and that made it much worse.
Just playing around with it now, it has greatly freed up, and is much freer than it was before the grease was applied, despite me doing nothing but leave it alone.

When it comes to the front bezel, I wonder if it's better just being clean and dry, with possibly just a smear of grease on the body/reflector/front glass mating surfaces?
Certainly with Oldham bezels, grease not only collected dirt, but also made it very easy to overtighten the bezel, with the grease then seeming to seep out of the contact areas and leave a lamp that was a real bugger to open.
 
A

Agrophobic

Guest
I'm looking at modifying my dick, oops sorry! duo, to take high power leds and increase brightness towards Scurion standard. but yeah, moisture does get in, hence the corrosion of the wiring. From past experiance of using silicone grease at depth (350m)
using too much grease can mean it gets forced out by water pressure so be sparing with it and only use it on the o rings and rubber parts.
Not that i think anyone would dream of using a duo at 350m but the theory still applies.
 

anfieldman

New member
Christian_Chourot said:
I think to avoid it, the key is not to open the lamp unnecessarily.

I haven't had any trouble with mine.......yet. But opening it unnecessarily? Petzl more or less encourage you to open it because they put a crap bulb in it and offer you a nice bright LED upgrade!  o_O


Burt

New member
I guess the wires had gone green due to misture, I noticed a lack of brightness after a year or so then decided to operate on it.

Yes, it was bathroom silicon - around the wire entry point as there should be no movement there.

The O rings which "seal" the switch and zoom control are also poxy, in fact the more I write the less I like about it.......
 
A

Agrophobic

Guest
Heres my latest Duo modification. it gives stenlight performance as far as brightness is concerned although not as rugged/waterproof of course.
The internal gubbins has all been replaced and a rod running between the switch and the zoom control carries cams which operate individual switches for the two driver circuits mounted on the back of the aluminium plate which acts as heatsinking for the two leds. both leds are cree Q5s at the moment but one will be replaced with a SSC P4 as this fits the 30 degree optics better. the other led has 10 degree optics. this gives a good spot while the 30 degree gives good spread. due to heat problems only one led is on at at time. both leds have 8 brightness modes of which only 5 are any use unless you want strobe or sos flashing modes. runtime is 5 hours on full power using 4 duracell 2650mah nimh AA cells. 10 hours on medium power and seems to go forever on powersave mode.

duosten1.jpg


duosten2.jpg

 
A

Agrophobic

Guest
Correction- this does not offer stenlight brightness. it's brighter.  ;)
Stenlight gives 140 lumens in turbo mode with both leds on. mine gives 200+ lumens in high mode from one led.
 
Top